

Over the last few entries we’ve kind of moved back and forth over man-improved and man made obstacles. We’ve covered hills, slopes, roads and trails, and bridges. Now we’re going to examine a few ways to use water as a natural, man-improved, and man made obstacle.
Bodies of water exist in a few different forms in rural communities. Rivers, creeks, streams, and ponds all present a movement challenge to the threat. Not only is it difficult to move through a shallow body of water for dismounts but water in any significant depth will prevent most wheeled vehicles from crossing. It’s not just the depth or speed of the water itself but when coupled with a bottom that is thick mud or a material like loose shale wheeled vehicles loose traction pretty quickly. If the water is deep enough and an engine running at operating temperature hits it there’s a couple of things that happen. Of course steam is produced however water is a lot like air in one aspect – it will seek any opening and fill that opening. So any kind of breather or dipstick without a good check valve is going to get backfilled. And water in a crankcase is death for a running engine. There’s four basic ways water can be enhanced as an obstacle: Speed, depth, width, and clutter. It’s pretty difficult to speed water up so we’re going to skip that one. Depth is a little bit easier. The average pickup truck has an air intake that is approximately 3 feet above ground level – not too hard to achieve. In reality you should go for as much depth as possible – HMMWV air intakes are often rerouted above the cab so six feet is better. Six feet also gives you something else – a higher water level than the air intake on an M113 APC. Rule of thumb – as deep as possible – the deeper the better. If the increased total depth after modification is less than 2 to 3 feet then it may be a waste of effort. More on that in a bit.
So how do you make water deeper and wider? Dam it. When I was a kid out in the country we didn’t have cool pools to go to. Not being too keen on swimming in some pretty filthy stock ponds we used to go out in the woods and find a decent sized creek to suite our purpose. But in the summer those creeks would often run low. To fix that we would damn it up. Not a really complicated process but it requires some material and labor. When we looked for a place to put our dam we would look along the creek bank and try and determine what spot would give us the best depth for our work. Knowing that water will always take the path of least resistance flowing downhill we would look at where the creek had overflowed it’s banks before. Normally that’s a pretty good spot to put a damn in. Anyway what you want to do is sink a few posts (we used wooden ones but the newer steel ones will work just fine) about a foot apart all the way across the creek. Then find some sheet material (we used corrugated tin) you build a wall on the upstream side of the posts overlapping the material as you go. Digging in the sheets on the bottom and sides was always the hardest part (dig in soft mud – it ain’t no picnic) but once the sheets were in place the water would come up pretty quickly. As time went on we added a few tricks like knocking holes in the tin with a Phillips screwdriver and hammer and using wire to hold it in place on the posts. We always backfilled our little dams on the downstream side and threw in whatever limbs and wood we could find to help build a support matrix behind it. Did it work? Hell yeah. A few weeks ago I took HH6 down to see one of the spots and thirty+ years later that old dam is still in place and still doing its job. It needs some work, but it’s there. Which returns us to another point about obstacles: You have to check them. Obstacles aren’t put in and ignore defensive measures because the environment will take its toll on them.
So we want to beef up a creek or stream in our AO. First rule of dams – make damn sure your dam doesn’t create some damn problems with your damn tribe (Arnie would be proud of that one). If you’re going to dam up water get offa yer backside and walk the basin area of that creek or stream. If it empties out into someone’s cattle pasture you might have a problem. Seasonal flooding is one thing but with no feed stores or fuel to cut hay ol’ Roy may need that pasture for his cows and if it ends up under a couple of inches of water he ain’t going to be too happy with your work. All part of keeping the peace in the tribe.
Anyway what we want to do is get out and identify all the possible and likely crossing places in our AO. You’ll find they frequently are near a bridge. That may be because the county put up a temp bridge while the regular bridge was under construction or closed for repairs. You’ll also often find them along trails used to get into and out of the woods. I’ve found the best way is to take a good long walk along the creeks and streams with a map in hand marking all of the possible crossing sites up and down those bodies of water. Once you’ve done that it’s time to get busy. Once I’ve identified a crossing location I look downstream for an isolated spot our of visual range of the crossing. Why? It doesn’t take much effort to knock down an ad hoc damn. A good rule of thumb is at least two or more bends downstream or fifty meters. Closer if you can conceal the damn with downed trees or brush but we want it out of direct visual range. The idea is that looks are everything. And if your average pack of dirtbags walks down to one bend and looks and it ain’t any better then odds are they’ll probably look no further and reroute elsewhere. Placing your dam well out of sight takes advantage of basic lazy ass human nature.
In the example below I’m depicting a creek crossing that is adjacent to a bridge. Notice we already put an abatis in and parked a truck on it as described in the earlier entry dealing with bridges. However that crossing creates a problem for us – it gives the threat a chance to attack an obstacle from the side.

So what we do is compound that obstacle even further by creating a wider and deeper creek. Note in the drawing below I would normally put the dam well away from that bridge but it’s closer to fit in.

The dam increased the width and depth of the water however I also compounded it by dropping trees into the water itself. That can help conceal the damn or the crossing while at the same time creating even further frustration for a threat – hence the term “clutter”. Chainsaws suck cutting in water and they sure don’t run underwater. And if those trees are interlocked and still attached to their stumps this crossing ain’t going to be an easy one. To compound it even further if you have access to a bucket (like a lift on a tractor) find you a few good sized boulders to dump in the middle of that crossing. And make sure you reinforce the dam itself so a heavy storm or wash doesn’t tear your dam out. Add a muddy bottom and this is a nightmare.
Why did I use the bridge as an example? In rural areas bridges most often cross low ground where creeks and streams run. And they’re normally built up well above the road level. A flowing body of water is going to back up until it has sufficient depth to overflow it’s dam. And if you build your dam correctly the water will fill in the areas on the side approaches to the normal creek path. Plus if that stuff is pretty swampy or heavily wooded it’s going to become moccasin country pretty quickly. Gotta love mother nature. Anyway this is one example of how to take advantage of a creek or stream. There’s another type of water body we’re going to address – ponds.
Ponds on property do a couple of different things. The most common is the ornamental yard pond that may be used for fishing or the regular old cattle pond. Either way once they are filled it’s pretty impossible to tell how deep they are. We’re going to use that to our advantage. Remember the entry where I listed some common types of vehicles and their capabilities? For SnG here it is again:
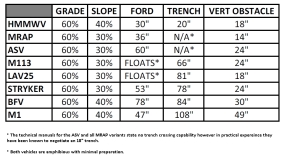
When it comes to water the thing that you should key in on is the “Fording Depth” or as listed “FORD”. That is the depth the vehicle can cross without swamping. The largest number on that chart is 78 inches (7 1/2 feet) So we want our pond to be at least that deep – we’ll use 7 feet for our planning numbers. But there is an additional number we need to be concerned with – a term called “swim depth”. Swim depth is the depth of water in which those two vehicles that are listed as “FLOATS” need to swim. In reality once an M113 is prepped it will swim in water as shallow as five feet. “So wait a minute Treaded- we need 7 feet but an M113 can swim in 5? That’s a problem”. Right you are. And we’re going to fix that problem or rather take advantage of the construction of the vehicles themselves. See That M113 and that LAV are kinda nose heavy. And they need a nice clean bank of less than 30 degrees to enter the water to be able to swim. And ya know what happens when they are in water too shallow to swim that the bottom drops off almost vertically? They pitch up ass over nose and go under like a sub doing an emergency dive. The M113 is much more susceptible to this than the LAV but the same thing applies. Once you get that air intake or crew compartment swamped they ain’t going nowhere – that’s the point the driver typically starts panicking. And a swamped vehicle regardless of whom is assaulting you is now a major catastrophe for the threat and is going to break his momentum. So let’s get the dozer out and cut a pond or add-on to an existing one. Now when you decide to put a pond in or increase the size of an existing pond a technique that works well is to cut the bank like so:

Notice we have our 7 foot depth with a five foot approach to our drop off of at least 4 feet which is less than 3 feet underwater. That in itself isn’t going to be within the performance parameters of either of those vehicles listed above. Additionally that four foot plunge is going to be pretty nasty to anyone that tries to cross on foot (unless you’re being attacked by a mutant basketball team). You could always throw some caltrops on the approach but if you have cattle I wouldn’t. Decent, but it could be better. Time for some compounding of our obstacle. I really want anything that tries to cross that pond to pitch up and nose down like a carnival ride. So what I’m going to do is add a little obstacle from the last entry – the log crib.

Now if you put these in on the approach there’s a few things to take into consideration. Logs float so you’ll have to find a way to tie them down or anchor them. Secondly if you put a log crib in too close to the plunge when a vehicle hits it it’s going to break loose and either float or sink off in the bottom – neither is a good thing. So allow yourself at least 3 feet from the edge of the plunge to give the soil adequate strength to hold it on impact. Now do you see what is going to happen here if say an M113 rolls up on this? It’s going to nose up as it climbs the underwater obstacle and then once it’s center of balance is over it (at which point it’s committed) it’s going to shoot nose down with all of that weight off of the plunge filling the air intake with water and once it’s full the engine compartment as well – even bilge pumps aren’t going to be able to handle that rate. Years ago when I had some downtime I was watching some engineers swim their M113s and I noticed they always kept the hatches open. I asked why and the short answer was “because if the vehicle dies or swamps it’s going to sink and trap the crew inside”. Sounds like a true “oh shit moment” for the threat to me.
So say we cut a new pond using the specs in the illustration and lay log cribs in but still have some gaps? At that point we can use posts to fill those gaps. A post is nothing more than a pole stuck into the bank of the pond pointed outwards. If the pole is anchored sufficiently and a vehicle runs onto it (especially if the approach and banks are muddy) it’s going to sit and spin it’s tires or track. If they had enough momentum and get stuck on it there’s another “oh shit moment” for the threat.

Ideally you want the tip of it below the water’s surface so the threat doesn’t see it until it’s too late and they’re committed and on top of the darn thing. Sinking this in at least four to five feet is going to be your best bet. Once again allow enough distance from the edge (3 feet from the nearest edge and not the top like the pic depicts…I’m going to have to get on the graphics department about this one) to prevent fracturing of the soil and sufficient angle to create some mayhem.
So I’m ready to hop on the dozer and start cutting a new pond right? Not just yet there’s just one more thing to look at. Do we need that steep angle and those obstacles everywhere? If you have the time, resources, and energy and want to go for it. Exiting the water vehicle won’t be as impeded by these obstacles but it’ll still give them some headaches. However realistically you probably only need these on the approach side that the threat is coming from. So what you do is lay things out and diagram it to save yourself some trouble. In the illustration below I have laid out my pond with the shallow approach depicted in red with both log crib and pole obstacles depicted.

Planning beforehand will save you time, energy, fuel, and resources. Notice how on the top edge where the pond diagram is irregular I spiked it with pole obstacles? That prevents me from having to create a bunch of small log cribs. Want to make it even worse? If you aren’t using it for cattle add some barbwire to those underwater obstacles. Everything goes better with barbwire 😉
So how do I deal with nosy neighbors and the other problems associated with cutting a new pond on my property (maybe within eyeshot of a road)? You can explain it as a cattle pond, fishing pond (stock it with cats anyway – another source of food is always a good thing), whatever. And if the nosy neighbors come by and see all of these log cribs and poles in my yet to be filled pond? They’re erosion control measures and the poles are to spread netting across. Yeah, that’s it. And then tell ’em to mind their own business or grab a shovel. That’ll get them scooting out of your view real quick.
As always these are just a few examples. Yes there are others out there but these are IMHO the simplest and some of the easiest to implement. Use your imagination and keep in mind that obstacles work both ways. The next obstacle entry will be a bit of a departure but I’ve been asked by more than one person to present a couple of way to interdict helicopters. There are a few tricks you can use and we’ll cover those in the next obstacle entry.
